|
There are many things that you know/heard:
- Radon is a colorless, odorless, and flavorless gas at ordinary temperature and pressure. - Number 1 cause of cancer for non-smokers and #2 cause for smokers. - Radon is present in the air nearly everywhere, and everyone breathes in radon every day, according to the National Cancer Institute. - The Surgeon General’s Office have estimated that as many as 20,000 lung cancer deaths are caused each year by radon. - Click here for more facts. Here are some things that will help reduce Radon gas levels in your home. -Check if your furnance’s fresh air damper is working correctly. -Install a fresh air damper if you do not have one. -Seal your sump crock. -Seal any cracks in the floor. -Seal any gaps where the floor meets the wall. Is there an existing system in place? Who installed it? Is it “properly installed”? Systems may be installed by those who are untrained, ignorant, or willing to do a "least cost" system that may have negative effects on radon levels, air quality, and energy use. The EPA recommends testing every two years. Many communities offer free radon test packs. You can also check your local hardware store and purchase them for $10-$15. While there is no "safe" level of radon, the goal is radon levels as low as reasonably achievable. Properly installed systems have proven capable of reducing any level of radon to below 4 and in most cases below 2. Continuous Radon monitoring is becoming more and more popular. The unit I use is WAVE, it’s a smart detector that sends results to your phone. And now they have introduced the WAVE PLUS, which measure Radon, Temperature, Pressure, Humidity, TVOC and CO2, for a little more. Click here for their website. The challenge of addressing radon in home inspection will continue to grow as states pass radon specific disclosure laws, banks enact stricter underwriting requirements and may expand dramatically and quickly if federal housing finance entities adopt radon testing and mitigation requirements. For example if Radon is disclosed above 4.0, many underwriters now require a mitigation system be installed. State of WI requires Radon piping be installed on all new construction. Real Estate professionals have adopted new addendums in regards to Radon testing. A great resource to address the most frequent questions: sosradon.org While some real estate agents and inspectors think that radon testing is required (which is not a bad thing), it really is not. In many communities, especially those areas with higher radon potential, radon testing is usually a standard procedure, even though it is not required by law. Unfortunately, in many other locations, people think, "radon is not a problem" which, of course, is not true and leads to a lack of testing and recognition of the risk posed by long-term exposure to elevated radon levels. Regardless of the views of the participants in real estate transactions, if spelled out in the offer to purchase it is critical that home inspectors conduct appropriate and accurate radon measurements, in a timely fashion, so you have a sound basis for the mitigation decision negotiation.
4 Comments
The fan’s damper can also get stuck in the open position, allowing hot air into the cool duct and creating condensation. Check the small damper at the fan. It should open when the fan is on and close when the fan turns off. This damper responds to fan pressure and gravity. Most vent connectors through the roof or sidewall should also have a damper to keep cold air out, and it should open and close with fan operation.
For many years, contractors installed bath fan vent ducting incorrectly, creating a bend or low loop to catch condensation. This just allows water to accumulate and may cause a large leak when the water lets go. Also assure the bath vent terminates to the exterior. Any bath vent that terminates in the attic or near an attic vents can cause moisture issues in the attic. There it is again – a loud squeak every time someone walks down the hall. This may be a good sound for parents hearing their kids, but it’s really annoying at 3 a.m. when someone’s just making a trip to the bathroom or kitchen. Floor squeaks are caused by natural shrinkage of wood due to changes in moisture content. As the wood dries, it shrinks, and nails can loosen. When you step on the floor, the wood moves and rubs against the fasteners. Squeak! Many options exist to correct floor squeaks. Often you can work from below to add (or “sister”) strips of framing wood to the existing joist. Use construction adhesive and screws to secure the strip of framing to the joist and the sub-floor. The construction adhesive is the key – it bonds to all surfaces and will not shrink as it cures. 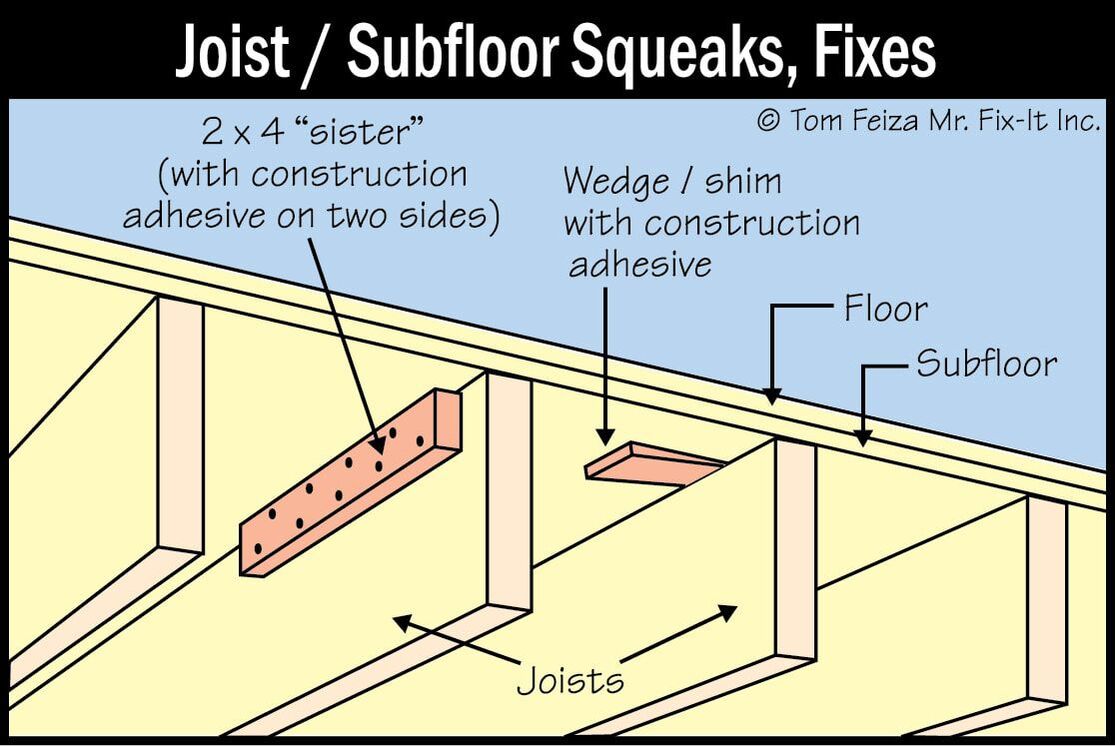 You can also add a thin wood shim to gaps between the floor joists and the sub-floor. Again, use construction adhesive. Gently tap the shims into the gap. Don’t pound the shims into the gap because this may widen it and make the problem worse.
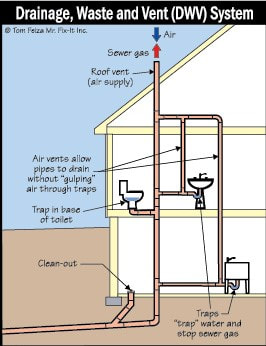
The DWV system in your building consists of a series of pipes connected to each fixture; they extend above each fixture, and the system terminates at an open pipe that extends through the roof. This piping allows air into the system and prevents unbalanced pressures in the piping.
The vent also prevents the system from drawing water out of a trap at the fixture with the characteristic “glug-glug-glug” as the drain gasps for air. Plumbing traps should drain smoothly and never “glug” or gasp for air. If you have a drain that empties slowly or gurgles as it drains, this may indicate a venting problem. If you flush a toilet and the sink gurgles, there’s definitely a vent problem. It is good idea to have a Plumber check this.
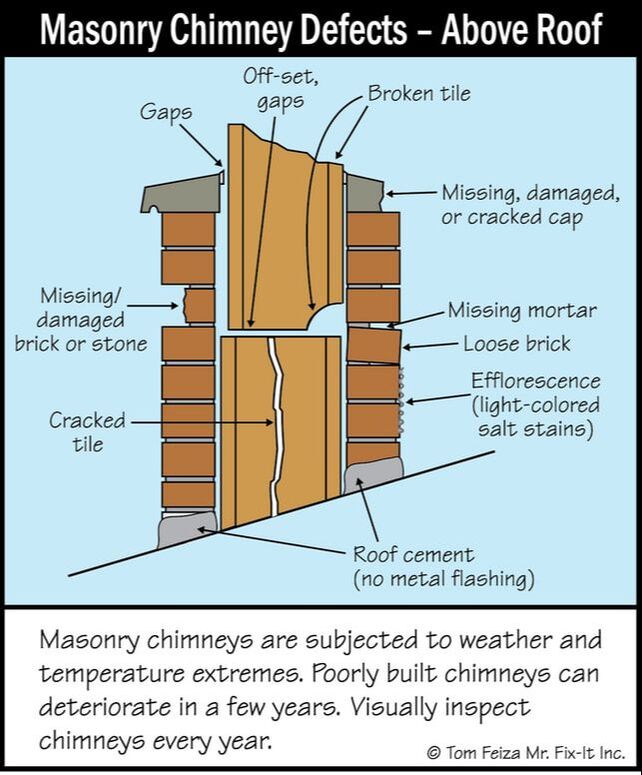
Finally, if the chimney is used for a wood-burning fireplace, you should have it cleaned and checked every year or two. Once you’ve burned about 100 wood fires, the chimney needs inspection.
You can see a lot from the ground, so take a good look. If you notice any problems or changes, call in a pro.
When a rain gutter/downspout and sometimes a sump pump send their discharge below grade to a pipe, it may appear that rainwater is draining into a sanitary sewer, but it really isn’t. In municipal areas with sewer systems, gutter (rainwater) discharge is normally routed into a storm sewer. This storm piping routes water to rivers and streams and is separate from the sanitary sewer system. Connecting your sump to a basement sink or floor drain sends your stormwater to sewer system, is against the rules. Municipal systems include a sanitary sewer system that routes toilet, shower and sink water to a sewage treatment plant. The flow of storm and sanitary sewer systems would never be combined unless a really old system is in place or there are problems with the system. In the old days before good sewage treatment, homes had combined sewers – but that is not common today. When you live out in the country, your gutters may discharge below grade and be directed underground to the side of a hill or a lower spot. Rural areas don’t have storm sewers. Look at the curb and gutter in front of your house. If you see grates there, rainwater flows into a storm sewer system below the street. If you sump pump is connected to drain line in the wall, it is most likely storm water.  Gaps along your walkways/patios/stoops and home including where driveway meets garage should always be caulked with a polyurethane to prevent water penetration. What most people forget is the backer rod and waste their caulk, filling in large area with caulk. What is backer rod? So you filled that wide gap in the exterior trim with the best caulk you could buy, and the next year it had pulled away from one surface, leaving a large gap. Or you tried to fill a wider gap, and the caulk just fell in the hole. What went wrong? No backer rod. Before filling a large gap with caulk, bridge the wide opening with a stiff foam backer rod. The backer rod is wide enough, so friction holds it just below the gap’s surface. The rod supports the caulk applied in an hourglass shape with a height-to-width ratio of about 1:2. Why? Caulk needs to expand and contract as surfaces move. The hourglass shape allows the caulk to bond to only two surfaces; the narrower section easily expands and contracts with movement. Caulk should never completely fill a space. It should never be applied to three sides or an unbridgeably wide gap, or it will quickly fail. Caulk can’t expand and contract when it is pulled in three directions or when the cross-section is too thick. You will find backer rods in larger paint and hardware stores. It is sold in lengths like rope, and it comes in various diameters. Choose a diameter that is wider than the gap to be filled, and force the rod into place with a blunt tool or putty knife. 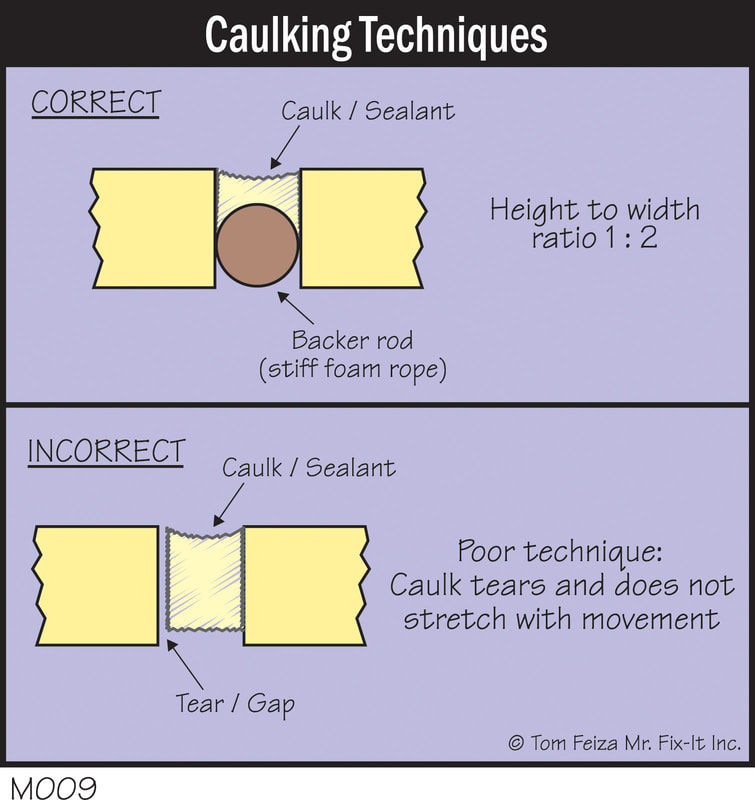 The largest, heaviest moving object in your home is the garage door. So, it makes sense to do frequent safety checks on the door. First, look for a safety label near the control button or the overhead door. It will tell you how to safely operate the door and test the reverse mechanism. Second, make sure the control button is mounted at least five feet above the floor or any step. This prevents small children from playing with the door operator. Third, never allow children to play with the door or the operator. Next, test your operator for reverse and door balance once per month. Follow the specific instructions on your door's safety label. If you don't understand these instructions or you don't have specific instructions for your door, contact a professional door service company. Throughout the year, check the door hardware for tightness. Consult your owner's manual for the proper lubricant, and apply it to rollers, tracks and other mechanical parts. Have the door serviced by a professional if there is any sign of problems. 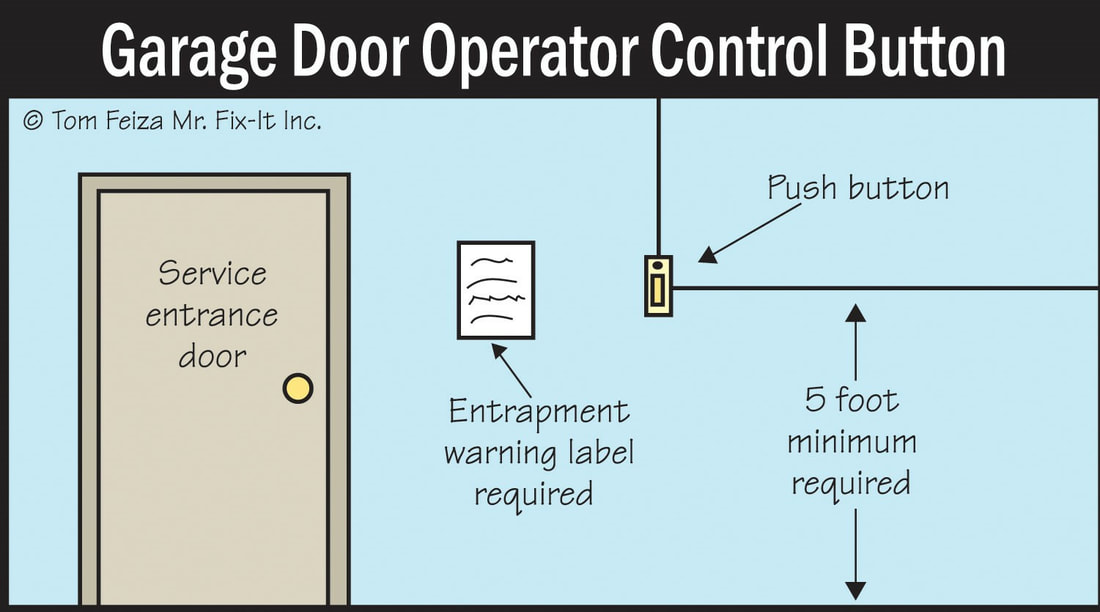 |
Author
Amelia's Home Inspection offers the highest quality Home Inspection services in Greater Milwaukee, Wisconsin at an affordable price. A home inspection provides an analysis of potential fire hazards, home safety and health risks to your family. Archives
January 2020
Categories |
 RSS Feed
Amelia's Home Inspection • [email protected] • www.AmeliasHomeInspection.com